Showing posts with label Modular Terrain. Show all posts

Monday, July 30, 2012

Terrain WIP: Imperial Cathedral


Last week, I put the Imperial Cathedral on the table for the first time. Afterwards, I realized that I had not posted any WIP updates for this piece of terrain.

It is a very large piece. I think it has character. Some of the younger gamers in the group have taken to calling it "Hogwart's." It was quite popular at the club.

Nevertheless, she is not complete. I plan to paint wood grain on the front door. Also, there are some great flat spaces for freehand painting. So, I am going to get all my Imperial Iconography out and pick some good stuff to paint on these 'wide-open spaces.'


Tuesday, July 17, 2012

Terrain WIP: Imperial Bastion Scratchbuild

 With all the cool rules for terrain in the 6th edition rulebook, I had the desire to build some terrain. I thought about the fortification FOC slot, and I decided to try my hand at building a Bastion.

If the piece turns out good, then I will get into the bits box and whip up a Quad Gun to defend my army from the flyers and winged monstrous creatures.

Here are some progress pics.


Friday, March 23, 2012

Scatter Terrain Progress: Obelisk and Stone Pyramids


 Here is the finished progress on the moss covered small pyramids and stone obelisk terrain. They were very easy to make.

Construction: I used some left over polystyrene to make the pieces for the obelisk piece. A little bit of work with the hot wire cutter to make the pieces in the shapes that I wanted and some wood glue. For the small pyramids, it was even easier to construct. My wife opened a box of something she had purchased. She said, "Do you want these styrofoam pieces?" I said, "Yes, I do!" They were perfectly square. So, I used the wire cutter to make a small square to top off each piece and glued them together with wood glue.

Painting: Everything got a base coat in the black Interior Home Wall paint. This was because spray painting will eat the foam. It is important to get a good seal with that base coat.

After the black, I mixed sand with PVA glue (watered down a bit). I painted this mixture over the each piece entirely to add texture. After the texture, I painted them brown. I wasn't worried about getting complete coverage. The purpose of the layering is to add variation and depth in the colors.

After the brown, I dry bushed codex grey followed by the same mixed with white. Continue mixing in more white with each successive layer of drybrushing until you are satisfied. Get increasingly more 'dry' or 'light' in your drybrushing as you go.

Final touches: I watered down PVA glue and painted it on, adding flock to make moss growing on the stones. I do this in small sections rather than trying to do it all in one go. After this dries, I take them outside and spray on a clear coat of sealant. This will keep your moss from rubbing off so easily during game play.


Monday, March 19, 2012

More Terrain for the Table


As promised, here are the pics of current terrain accomplishments. I have completed the first of the Tank Traps bases. Also, I started on some small stone pyramids and some stone pillars. I will cover large portions of the stone pillars pieces in moss. I expect it to look pretty good upon completion. Let me know what you think, and thanks for reading.


Sunday, February 26, 2012

Gaming Board and Modular Terrain WIP


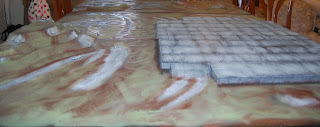
 I apologize that I have been so delayed in posting any pictures of my progress in the terrain department. I have completed the Modular Gaming Board. It is a full 6x4 foot board that is composed of 4x2 segments. I can do some more work to it should I desire it. Nevertheless, it is more than serviceable.

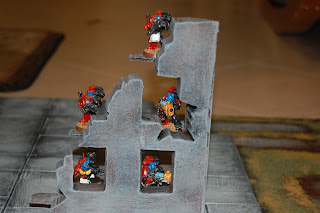
The sad part is that I have, or had, no terrain to populate the board. So, I began work on some ruins and barricades. I got very tired of not having any scatter terrain for the board. As a result, I gave up on adding any more details and painted up the pieces that I have. These pieces include two ruined buildings and four barricades (pictures included). Each of these can be improved upon, but they are serviceable.

Following the completion of these pieces, I started a new piece of terrain, a tank trap. I intend to make a few more of these pieces. The concrete pylons are made of a portion which I cut off an egg carton. These were then glued to a polystyrene base.

As Rogue Pom had asked for some photos of the board and terrain with models included for scale, I have included some of my Angels Sanguine. The Tactical Marines and Devastators haven't seen the table in a long while. So, I let them out for the photos.

I apologize that some of the photos are a bit fuzzy.


Saturday, January 21, 2012

Terrain WIP: Imperial Cathedral and Barricades


These pictures show the progress of my Imperial Cathedral. Also, I have thrown together some barricades to scatter about the board. I believe the pictures tell the story. I am closing in on throwing some paint on this stuff.

As always, your comments are welcome. Also, I would be glad to answer questions about my methods.


Monday, January 16, 2012

Modular Terrain WIP: Day Four

 More progress made today. I have added some green paint over the brown.

I applied some black paint thinned down into a wash over all the rocks (areas sprayed gray) to bring out the details.

After that, I began with a gray drybrush (working up through a couple of shades mixing white) over the rocks and on the raised terrace/foundation of the city.

I think that I am ready to start with flock and static grass.


Sunday, January 15, 2012

Modular Terrain WIP: Day Three


 I added some color to the board. I sprayed some gray in the low places and on the rocks. After that, I sprayed on a good earthy color: brown.

While I was waiting on that to dry, I started work on my Imperial Cathedral. I have also included a couple of pictures of the first generic ruins.
Imperial Cathedral

I hope you enjoy. As always, thanks for reading, and comments are welcome.
Imperial Cathedral


Saturday, January 14, 2012

Modular Terrain WIP: Day Two

An update on my progress and method. Yes, there is a method to my madness.

Well, everything had plenty of time to dry during the week. So, with all the glue dried, I was ready to put on a base coat of paint. I was off to Leroy Merlin in order to buy a gallon of paint.

As an American living in Italy, I had a pretty fun time trying to buy the right paint. The gentleman working in the paint department didn't speak English, and I don't really speak Italian (enough for greetings and ordering food or an espresso at the Caffe Bar). So, he logged onto his computer and navigated to Google Translate. I typed in what I wanted, and he typed in the response. All in all, it was a pretty cool experience.

I learned a few things. One important one is that we Americans are fond of talking about latex paint. The Italian paint industry does not follow this pattern. My understanding from further research is that there is not any actual latex in latex paint. It is a term which we use to describe several different polymer compositions which act like latex after they dry.

Asking for textured latex paint did me no good. After telling him what I was doing, we found a non-textured acrylic paint which is water soluble for cleaning and dries to form a flexible and resilient coat of paint.

I painted this on with a brush. It took three coats to cover the yellow polystyrene. After this had dried, I began putting modeling sand (I used a tub from GW) into the craters. I painted on PVA glue and poured the sand in on top. I also glued on some small rocks which I grabbed out of the parking lot at my apartment. I brought the rocks/pebbles in and rinsed them off. After drying, I placed them into some of the low places with PVA glue.

I want to mention that I traced out a pattern for cement/asphalt on the raised terrace. I cut a small 'v' into the surface to imitate the joints in cement or concrete. I also cut some small squares of thin, one-layer cardboard (from a cereal box) and glued them on the side of the raised terrace area. This will add a bit of detail to look like joints in concrete or the like.

We are well on our way. I ordered a bunch of flock and static grass, but the next step is more painting.

Monday, January 9, 2012

Modular Terrain WIP: Day One

 I started the Modular Terrain Gaming Board officially today. Technically, I did quite a bit of internet research via google last night. I found the following links which I found helpful: Cool Mini or Not and Digger's Rest. Also, Karitas shared his work with me, and I found it to be tremendously helpful as well.


Following Karitas's advice, I started with some sketches in my notebook. I decided to build a city on a raised terrace on two separate pieces of my 2'x4' polystyrene (I bought this at Leroy Merlin over the weekend aproximately 15 Euro for 6 sheets sized 2'x4'). The two pieces could be together for one large city or on opposite edges of the table for two separate city sections. I wanted to put a hill on the opposite side of the same boards as the city. On the remaining  2'x4' board, I decided to place hills with trench works. The pictures will reveal that I abandoned this idea during the manufacturing process. I decided that trench works should be a separate board, and that rolling hills and craters would serve for this board.

Three of the 2'x4' polystyrene sheets would form the 'ground' for the battlefield. I used a sharpee pen and a standard tape mearsure to sketch out my pieces on the remaining three sheets of the polystyrene. I would use those pieces to build up from the 'ground.'

I cut out the raised terrace or foundation for the city portion and the three layered hill as see in the photo. Of course, I double and triple checked to make sure that they they were flush (lined up evenly) before I glued them.

I used a hot wire cutter whenever it could reach and an x-acto knife where the cutter couldn't reach. I have an old wooden chopping block which I use under all cuts with the x-acto knife to keep from cutting anything in my house, for example: my wife's Italian dining room set or a rug thrown over our tile floor.


 Furthermore, hot wire cutters get hot. So, BE CAREFUL. Also, modeling knives are very sharp and cut deep. So, BE CAREFUL and cut away from yourself.

I left the raised terrace/city foundation squared off. It will become man-made concrete base for the city. However, I sloped the hills. I want them to look as natural as possible while still providing excellent places for minis to stand or drive.

 After cutting and sloping and sanding the hills until I was content, I glued them to the 'ground.' On occasions like this one, I am happy to be a Chaplain in the U.S. Navy. My degrees in Theology mean that I have a fairly significant personal library with lots of big, heavy reference material to weight down the poly while the glue dries.

It was at this point in the process (beginning work on the third 'ground' sheet) that I cancelled the idea of the trench works for this board. After seeing the sheets laid out in real size, it seemed as though I was forcing a combination between two great but separate ideas for gaming boards.

I opted for rolling hills with craters. I cut out some pieces to build up my hills and began shaping them. They are sloped off with the wire cutter, melted with a butane cigar lighter, and sanded with fine grit sandpaper.

I used the cigar lighter to melt wholes into the raised portions, and on occasion slightly into the 'ground.' These wholes will become craters and blast marks later.

I glued the rolling hills on and left it all to dry. I used Wood Glue for all the gluing up to this point.